
DIY Water Bottle Crafts are all about fun and eco-friendliness. They’re perfect for anyone who loves to get creative. You can turn an ordinary water bottle into something special. Think about making cool decorative accents or handy organizers. It’s more than crafting. It’s about being mindful and loving our planet. Imagine creating beautiful vases to add a touch of nature to your home. Or, fancy making unique jewelry that shows off your personal style? Each project proves that every used bottle has so much potential. Jump into our world of crafting ideas. It’s where simple meets creative. Every snip and cut you make helps in reducing our environmental footprint.
DIY Water Bottle Crafts: Eco-Friendly Creativity Unleashed
DIY, or “Do It Yourself,” means you get to be the maker and creator! It’s about taking on fun and exciting projects all by yourself, with no need to call in the pros. Whether it’s crafting cool things, sprucing up your garden, fixing up the house, or any other creative project, DIY is the way to go. Why not try making something unique? It’s a fantastic way to show off your artistic side, learn something new, and even save a few bucks. Plus, when you do it yourself, you get to make everything just right for you. From easy, everyday fixes to big, bold projects that get your creative juices flowing, DIY is your chance to shine. It’s hands-on, super rewarding, and a blast to share with friends and family. Get ready to create, innovate, and design with a DIY project today – and see where your imagination takes you!
Why DIY Water Bottle Crafts?
DIY water bottle crafts are not just fun. They’re also super green! These crafts allow you to get super creative. Think about it. A plain water bottle can turn into a beautiful vase, a funky pen holder, or even a quirky chandelier. The possibilities? Endless! Every project is a step towards a more sustainable life. And guess what? You reduce waste with each water bottle you repurpose. It’s amazing how a simple bottle can become so much more. Plus, doing these crafts is a fantastic way to spend an afternoon. Whether you’re crafting by yourself or with friends and family, it’s always a good time. And the best part? You add a personal touch to your home decor. DIY projects like these are not just crafts. They’re a statement of creativity, sustainability, and fun.
How does it contribute to the environment?
DIY water bottle crafts contribute to the environment in several meaningful ways:
- Reduction of Plastic Waste:
Crafting with used bottles reduces the amount of plastic waste in landfills, contributing to a cleaner and less-polluted environment. - Upcycling:
By repurposing discarded bottles, DIY projects promote the concept of upcycling. This process extends the lifespan of materials, minimizing the need for new resources. - Resource Conservation:
Upcycling bottles conserves resources that would be otherwise used to create new products. This helps in reducing energy consumption and environmental impact associated with manufacturing. - Educational Impact:
Engaging in DIY water bottle crafts promotes environmental awareness. It encourages individuals to rethink the lifecycle of products and adopt more sustainable practices. - Reduced Carbon Footprint:
By upcycling and creating functional items from existing materials, DIY projects contribute to lowering the carbon footprint associated with the production and disposal of new goods. - Encourages Sustainability Practices:
DIY bottle crafts serve as a tangible example of sustainable living, inspiring others to adopt eco-friendly habits and reduce single-use plastic consumption.
Overall, DIY bottle crafts provide an accessible and creative way for individuals to actively contribute to environmental conservation and foster a more sustainable lifestyle.
DIY Water Bottle Ideas for Sustainable and Stylish Crafting:
Let’s step into a world brimming with creative potential as we discover fun and imaginative DIY projects using water bottles. You can transform these everyday items into something truly unique and special. These projects aren’t just for fun; they’re a bold expression of originality and a nod towards living more sustainably. Picture turning those bottles into handy organizers or eye-catching decor. Each project you tackle is a step forward in minimizing waste and personalizing your space. Get ready for a crafting adventure that not only sparks your imagination but also contributes to a healthier planet. Join us as we repurpose water bottles, one innovative project at a time, making a stylish and eco-friendly statement.
Bottle Vases and Planters:

Brighten up your living space with a dash of green. Turn old water bottles into adorable vases and planters. This fun, eco-conscious project not only elevates your home but is an excellent way to recycle. Think different sizes and shapes to match your unique style. Whether it’s for your cozy indoor spot or sunlit garden, these crafts add a personal touch. Plus, it’s super easy! Just a few snips, some decor tweaks, and a pinch of creativity. Soon, you’ll have whimsical water bottle creations that make your plants look fabulous.
Creating Bottle Vases and Planters:
- Gather Your Materials:
Collect clean and empty water bottles, scissors, craft knife, acrylic paint (optional), and decorative elements like ribbon or twine. - Prepare the Bottles:
Remove labels and thoroughly clean the bottles. If desired, use acrylic paint to add color or patterns for a personalized touch. - Cutting and Shaping:
With a craft knife or scissors, carefully cut the top portion of the bottle to create the desired height for your vase or planter. Consider experimenting with different shapes and sizes. - Decorate (Optional):
Enhance the aesthetic appeal by wrapping the bottle with decorative ribbon or twine. This step adds a charming touch and covers any imperfections from cutting. - Drainage Holes (For Planters):
If creating a planter, use the craft knife to make small drainage holes at the bottom. This ensures proper water drainage for your plants. - Planting:
Fill the bottle with soil and add your chosen plants or flowers. Be mindful of the type of plants you select and their sunlight and water requirements. - Arrange Your Vases:
Place your newly crafted vases on shelves, windowsills, or tables. Experiment with different heights and styles for an eclectic and visually appealing display. - Maintenance:
Water your plants as needed and enjoy the sustainable beauty of your DIY bottle vases and planters. Refresh the water or soil periodically to keep your creations vibrant.
This simple and eco-friendly DIY craft with empty water bottles not only reduces plastic waste but also adds a touch of nature to your living space. Experiment with various bottle sizes and decorative elements to make each creation unique.
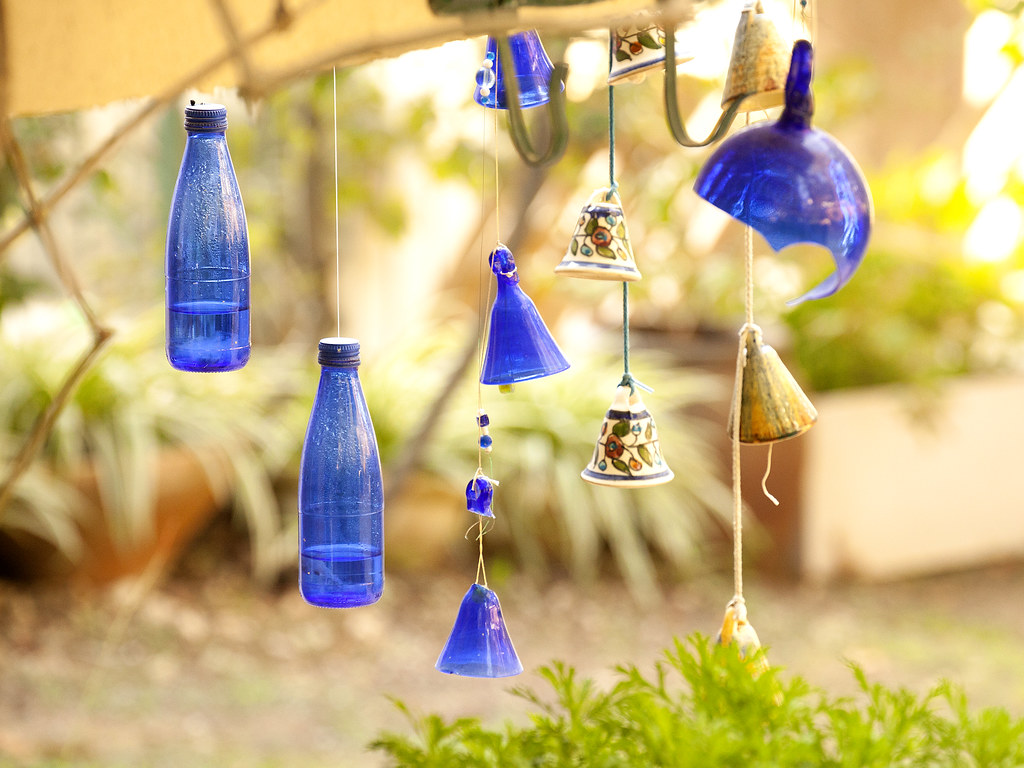
Upcycled Bottle Jewelry:
Transform your empty water bottles into trendy, eco-friendly accessories with this fun DIY idea! By giving a new purpose to plastic bottles, you can design unique and fashionable jewelry. There are a lots of plastic water bottle crafts, but these upcyled bottle jewelry are very easy to make. Think about creating your very own earrings, necklaces, or bracelets—the creative options are truly limitless. Discover the joy of cutting, twisting, and adding personal touches to make jewelry that not only stands out but also underlines the importance of recycling. This DIY endeavor is not just about crafting; it’s about turning something old into something new and fabulous. It’s a chance to inject a bit of your personality into your jewelry box while doing your bit for the planet. Get ready to make a style statement that’s as eco-conscious as it is eye-catching!
How to Make Upcycled Bottle Jewelry:
- Gather Materials:
Collect clean and empty water bottles, scissors, craft knife, acrylic paint (optional), jewelry findings (e.g., earring hooks, jump rings), and decorative elements like beads or charms. - Prepare the Bottles:
Remove labels and clean the bottles thoroughly. If desired, use acrylic paint to add color or patterns to the plastic. - Cutting and Shaping:
Use scissors or a craft knife to cut the plastic bottle into desired shapes for your jewelry. This can include geometric pieces for earrings or strips for bracelets. - Decorate (Optional):
Enhance the aesthetic appeal by painting or adding decorative elements to the cut plastic pieces. Experiment with colors and patterns to suit your style. - Create Holes:
Use a hole punch or a heated needle to create holes in the plastic pieces. These holes will be used to attach findings and create jewelry. - Attach Findings:
Connect earring hooks, jump rings, or other findings to the holes you’ve created. This step transforms the plastic pieces into wearable jewelry. - Add Beads or Charms (Optional):
Customize your jewelry further by adding beads, charms, or other embellishments. This adds a personal touch and enhances the overall aesthetic. - Finalize and Wear:
Once all elements are in place, your upcycled bottle jewelry is ready to wear. Showcase your eco-friendly creations and inspire others with your stylish and sustainable accessories.
Upcycled bottle jewelry turns waste into wearable art, blending style with sustainability. Each piece tells a story of creativity, responsibility, and eco-conscious fashion.
DIY Water Bottle Bird Feeders:
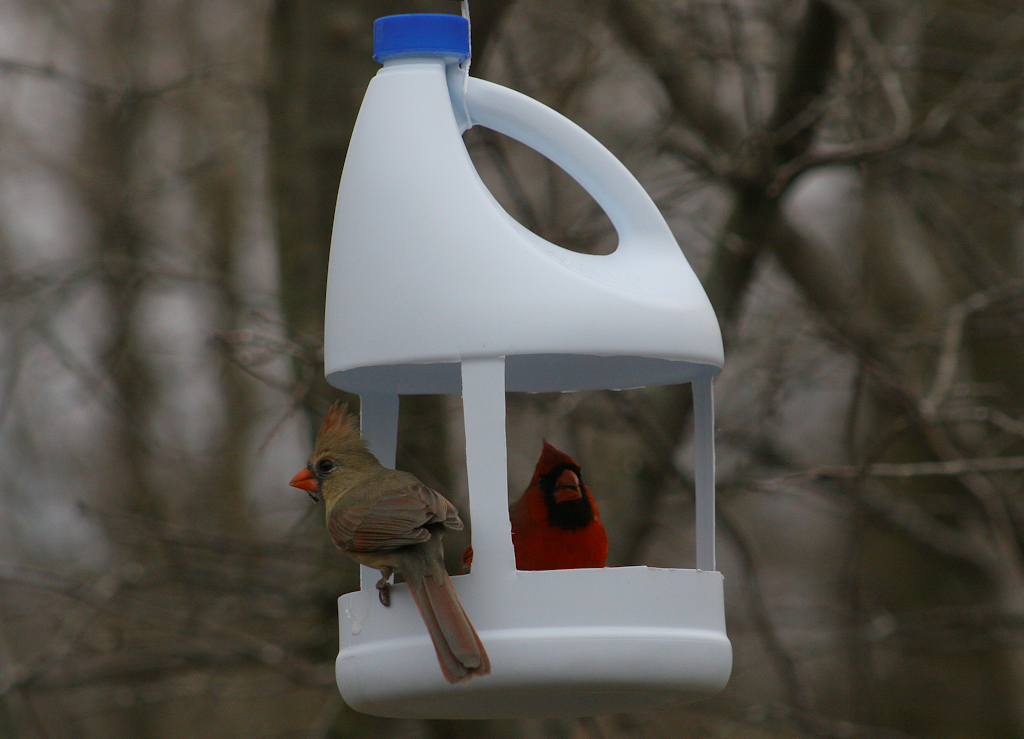
Transform old water bottles into inviting bird feeders with a simple, eco-conscious DIY project. Begin by cutting the bottle to create an opening. Next, add small perches for the birds to rest on. Fill your new feeder with birdseed, and then hang it in your garden. These repurposed bottle feeders are a fantastic way to attract and feed local bird species. Not only will you give discarded bottles a new lease on life, but you’ll also add a charming touch to your outdoor space. Watching the birds visit can become a peaceful, enjoyable part of your day. Plus, you’ll be doing your bit for the planet. This project is an easy, impactful way to enjoy nature’s beauty and help in environmental conservation. Start building your bird-friendly haven today and make your garden a lively, welcoming spot for feathered visitors.
How to make DIY Water Bottle Bird Feeders?
Creating DIY Water Bottle Bird Feeders is a one of the simple Water Bottle Projects that brings joy to both you and your feathered visitors. Follow these steps:
- Gather Materials:
Collect an empty plastic water bottle, scissors, twine or string, and birdseed. - Prepare the Bottle:
Carefully cut the bottle in half, leaving the bottom portion as the feeder. - Add Perches:
Insert small sticks or dowels horizontally through the sides of the bottle to create perches for birds. - Punch Holes:
Make small holes just below the perches for seeds to spill out. This allows birds to access the birdseed easily. - Fill with Birdseed:
Pour birdseed into the bottom half of the bottle, ensuring it’s filled to the level of the holes. - Attach Hanger:
Create a hanger using twine or string. Secure it around the neck of the bottle, making it easy to hang. - Hang in Your Garden:
Find a suitable spot in your garden or on a balcony, and hang the DIY bird feeder at a height accessible to birds. - Enjoy the Visitors:
Sit back and watch as birds flock to enjoy the birdseed. Refill the feeder as needed to continue attracting wildlife.
Water bottle DIY crafts are meant to be easy, so is this. This DIY project not only repurposes plastic bottles but also provides essential nourishment for local bird populations, making your outdoor space a welcoming haven for nature.
Functional Water Bottle Organizers:
Creating your organizers from water bottles is fun and eco-friendly. I bet whenever you think of empty water bottle crafts, this one comes in to your mind. Imagine turning those empty water bottles into something useful! You can make desk organizers, cute pen holders, and even small storage spots for your bits and bobs. First, cut the bottles to the size you need. You can also add a splash of color or patterns to make them unique. Then, organize your desk with these. Place pens, pencils, and tiny office items in them. This DIY idea is great for keeping your space tidy. Plus, it’s a big win for the planet because you’re reusing bottles. Welcome these handy and green organizers into your life. They bring order and a touch of creativity to any room.
How to make a Functional Water Bottle Organizer?
Creating a Functional Water Bottle Organizer is a practical and eco-friendly DIY project. Follow these steps to craft your own organizer:
- Gather Materials:
Collect empty plastic water bottles, a pair of scissors, decorative materials (optional), and any additional crafting supplies. - Prepare the Bottles:
Remove labels and clean the bottles thoroughly. Decide on the height you want for each organizer section. - Cut the Bottles:
Use scissors to cut the bottles to your preferred height. Consider varying the heights for a tiered organizer. - Decorate (Optional):
Add a personal touch by decorating the bottles with paint, adhesive paper, or any other creative materials. - Arrange the Sections:
Arrange the cut bottles to create sections for different items. For example, one section can hold pens, another can store scissors, and so on. - Secure the Sections:
Use adhesive or tape to secure the sections together, ensuring stability. - Place on Desk or Shelf:
Position your DIY organizer on your desk or a shelf, making sure it’s easily accessible and visually appealing. - Utilize the Organizer:
Fill each section with office supplies, crafting materials, or any items you want to keep organized.
This DIY project not only helps you organize your space but also repurposes plastic bottles, contributing to a more sustainable and clutter-free environment.
Decorative Bottle Lights:
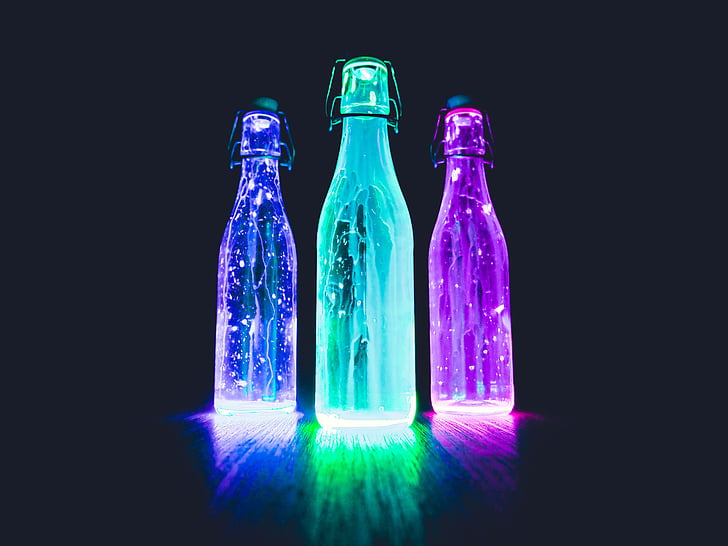
You probably have seen a lot of decorative lights on the internet. Worry not, you can make your own from empty water bottles. You just have to DIY with water bottles. Don’t worry, we have got your back. Below you can see how you can make decorative bottle lights in a step-by-step guide.
- Gather Materials:
Collect empty water bottles, string lights, craft glue, a craft knife, and any decorative elements you want to add. - Prepare the Bottles:
Remove labels and clean the bottles thoroughly. Ensure they are completely dry before starting the craft. - Cut the Bottles:
Use a craft knife to carefully cut the bottom section of each bottle. Adjust the height based on your preference. - Decorate (Optional):
Add a decorative touch by painting the bottles or attaching embellishments like beads, glitter, or colored paper. - Insert String Lights:
Coil a string of LED lights and insert them into the cut section of the bottle. Ensure the lights are distributed evenly. - Secure the Lights:
Use craft glue to secure the lights in place. Allow the glue to dry thoroughly. - Illuminate:
Switch on the string lights to see your Decorative Bottle Lights come to life. Place them on shelves, tables, or as a centerpiece. - Personalize (Optional):
Customize the lights by experimenting with different colors or shapes, creating a unique ambiance.
By repurposing water bottles into decorative lights, you not only reduce waste but also add a whimsical and eco-friendly element to your living space.
Personalized Slipper Sleeves:
Personalized Sipper Sleeves are just what you need to add a spark to your daily hydration routine! Imagine a cover for your water bottle that is as unique as you are. These charming sleeves come in a variety of materials. You can choose from fabric or felt, depending on what catches your eye. What’s fantastic is that they’re made to fit your bottle like a glove. Think about all the fun designs, vibrant colors, and eye-catching patterns you can pick. It’s all about showcasing your personal style.
Creating these sleeves is super easy and fun. You can sew them up or opt for a no-sew version with fabric glue. It’s all up to you! How about personalizing them? Add your initials, favorite quotes, or any decorative flair that speaks to you. This way, you’re not just dressing up your water bottle. You’re crafting a statement piece. And the best part? You’re taking a step towards a more sustainable, personalized, and stylish hydration habit. Get ready to turn heads with your water bottle, all while keeping hydrated in the most creative way possible!
How to Make DIY Personalized Slipper Sleeves:
- Select Materials: Choose fabric, felt, or any preferred material for your sleeve. Ensure it is wide enough to wrap around the bottle.
- Measure and Cut: Measure the circumference and height of your water bottle, then cut the chosen material accordingly, leaving extra for seam allowance.
- Design Your Sleeve: Get creative with designs, colors, and patterns. Consider adding pockets for small items or personalizing with embroidery or fabric paint.
- Sew or Glue: If using fabric, sew the sides together, creating a tube that fits your bottle. For non-sew options, use fabric glue to secure the edges.
- Add Closure (Optional): Include buttons, snaps, or Velcro for a closure mechanism, ensuring the sleeve stays snug on the bottle.
- Personalize Further (Optional): Add your initials, favorite quotes, or decorations to make the sleeve uniquely yours.
- Slide Onto Bottle: Slip your crafted sleeve onto your water bottle, adjusting it to fit securely. The sleeve not only adds style but also provides insulation.
- Enjoy Your Personalized Hydration: Stay hydrated in style with a water bottle that reflects your personality and creativity.
Crafting Personalized Sipper Sleeves is a fun and functional way to showcase your individuality while contributing to a more sustainable and personalized hydration experience.
Bottle Bottom Coasters:
Bottle Bottom Coasters are a creative and eco-friendly way to repurpose the bottom sections of water bottles into functional drink coasters. By cutting and arranging these sections, you can craft coasters that not only serve a practical purpose but also add a touch of eco-chic to your home. These coasters showcase the versatility of upcycling, turning what might have been discarded into a unique and sustainable home accessory. Creating Bottle Bottom Coasters is a simple yet effective way to contribute to a greener lifestyle while adding a distinctive touch to your living space.
How to Make DIY Bottle Bottom Coasters:
Making DIY Bottle Bottom Coasters is not just a fun DIY project; it’s a green way to add a personal touch to your home. Here’s an easy-peasy guide to creating these unique, eco-friendly coasters. You’re about to turn trash into treasure.
- Gather Your Supplies:
Start by rounding up some empty water bottles. Think about how many coasters you’d like to create. This is your project, so the decision is all yours.
- Cutting Time:
Grab a pair of scissors or a craft knife. Now, carefully cut the bottom part of each water bottle. Aim for a smooth, neat cut. Remember, safety first!
- Wash and Dry:
Next, give those cut bottle bottoms a good rinse. Washing them ensures they’re clean and ready for the next step. Make sure they’re totally dry before you move on.
- Unleash Your Creativity:
Here comes the fun part – decorating! If you’re going for a sleek, minimalist look, you might skip this step. But if you love a bit of flair, use paints, markers, or even the art of decoupage to jazz them up.
- Sealing the Deal (Optional):
For a more polished appearance, consider sealing the edges. Gently run the cut edges over a candle flame. This slightly melts and seals them, giving a nice finish.
- Adding a Base (Optional):
Want to keep your tables scratch-free? Attach a felt or cork base to each coaster. This step adds stability and protects your furniture.
- Display and Use:
Now, place your Bottle Bottom Coasters around your home. They’re not just practical; they’re conversation starters that show off your upcycling skills.
By choosing to upcycle water bottle bottoms, you’re playing a part in reducing waste. Plus, you end up with one-of-a-kind coasters that reflect your commitment to the planet. What’s not to love?
Conclusion:
Start your crafting journey by turning everyday items like water bottles into unique and useful art. It’s more than just a fun activity. It’s about making a difference. With every bottle you transform, you’re stepping towards a greener planet. Think of it as crafting with a cause. You’re not just creating something beautiful. You’re making a statement about sustainability. And the best part? It’s easy to get started. All you need are some basic supplies and a bit of creativity. By repurposing water bottles, you’re not only showcasing your artistic talent. You’re also helping to reduce waste. It’s a win-win. You get to enjoy a fun, creative hobby while doing your bit for the environment. Join us in turning waste into wonder. It’s a small step that can make a big difference in our world.